Big Bad Thumb
BIG BAD THUMB
Level 1-2
This lesson contains:
• 2 pages of text
• 2 pages of TAB
• 3 mp3s
• 1 video
Level 1-2
This lesson contains:
• 2 pages of text
• 2 pages of TAB
• 3 mp3s
• 1 video
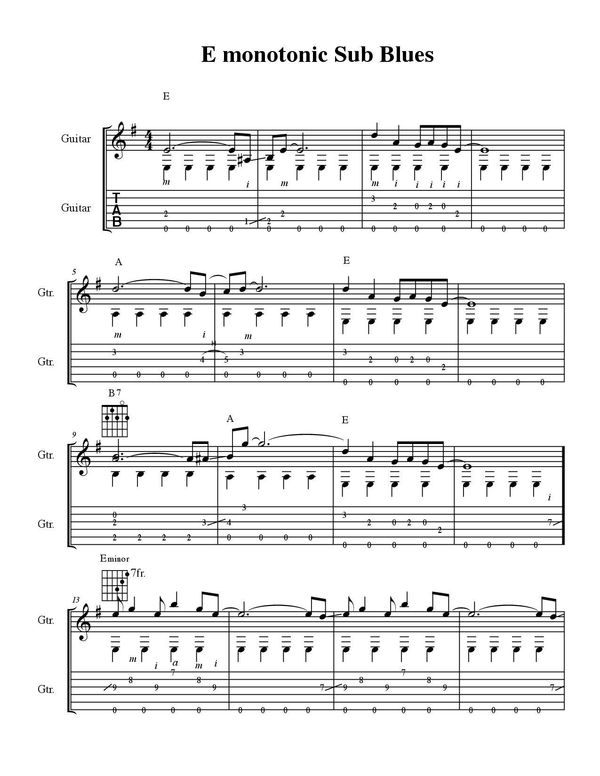
A lot of early fingerpicked blues use an alternating bass (played between 2 or more strings), but many other grooves employ a single string or “dead” thumb bass. In this lesson we will work through a 12 bar blues in E with a single string bass. We will also play a 12 bar variation on that theme. The groove is simple, but requires keeping that steady bass which can be more difficult than it at first seems.
If you can count to 4 and tap your foot you can play blues. Yes, this is true, but there is so much more to it! The bass pattern that we play with our thumb is steady and percussive. What I mean by “percussive” is that the bass notes are often muted and sound less like actual notes and more like someone beating a drum: a low throbbing, audible drum. This underlies everything else and can get lost in the shuffle – no pun intended! The trick, then, is to make the treble notes sound like they have an entirely different voice. Part of this is simply rhythmic: where is the treble played in relation to the bass. But part of it – the part that is difficult to articulate – is feel. Yes, you can look at the TAB, but more importantly, listen to the music.
PRACTICE TIP: Listen, Listen, Listen. I can’t emphasize this enough. After fifteen years of teaching I still need to remind students that one of the most important parts of their practice is “informal” listening, i.e. listening for pleasure. As we listen our conscious and unconscious mind form connections. Struggling through a difficult passage of TAB is only as much fun as your ear dictates.
Another aspect to getting the feel correct is repetition. Playing the same thing over and over again can be tedious, but in the process of repeating these phrases your appendages learn how to make things sound good! The process goes something like this:
1) Learn the phrase(s)
2) Repeat
3) Create a feel
4) Sound good!
In the beginning of “Big Bad Thumb” we play very sparsely; this gives us the opportunity to set the groove. By the third measure we are ready for something a little more busy and thus the riff that sounds a little like “Susie-Q” – the riff created many decades ago by James Burton.
When we shift to the A chord in measure 5 we play the 5th string as our bass note with a short simple series of notes played on the 3rd and 2nd strings. When we come back to the E chord we repeat the “Susie-Q” riff. We then play a quick B7 and finish off the first 12 bar with the “Q” riff.
In the second 12 bar we move up the fretboard to play an E minor triad in between the 7th-9th frets (see fret graph in TAB). I think this riff sounds extra cool! So cool, I play it again. Then, when we move to the A chord, we play a very similar riff using a slightly different fingering (note video).
When we get to the B chord in the 4th to last measure I shift the melodic emphasis to the bass. This requires that you move your index and middle fingers down to the 5th and 4th strings respectively to fingerpick those strings. Same goes for the A chord.
www.learnbluesguitarnow.com

